A Backyard Project

What do you do with a backyard that is somewhat rooted and shaded and does not support grass growth? Mulch is low maintenance, but gets washed away in the rains. We toyed with building a deck or even a stone patio area. After a lot of thought and some research, I decided that an area of artificial turf would best suit our needs. It would be a great sit-down area and a nice romping space for the grandkids.

Most of my projects are learned on the job. I cannot always afford the cost of someone else’s labor. So I try to do the learnable and doable myself and leave the more critical and complex projects to the experts.

The first step was to measure out the area to avoid as many tree roots as possible. We love our oak tree and its shade! The ideal area worked out to be a 14 by 13 foot rectangular space. While we could have just put the artificial turf down on the ground, we decided to do the extra work to get it right.

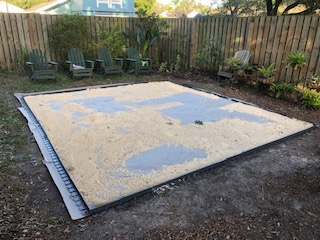
(1) The area was measured and marked out and the odd clumps of grass sod removed. After raking, leveling and compacting the ground, paver borders were fixed to mark and contain the project.

The picture below shows the area marked out, leveled and compacted.

IMG_0520

(2) Next the area was covered with weed mat and sand for further leveling.

IMG_0521

(3) An underlayment was then placed over the leveled sand to prepare the surface for the artificial grass.

IMG_0524

(4) The artificial grass was then rolled onto the area and secured.

IMG_0528

(5) Finally a decorative perimeter of bricks was secured in place with paver borders.

IMG_0630

The project area is slightly raised and gently sloped away from the house to allow for drainage and to keep it useable even on wet days.  We had a few really wet days and have noticed that the area drains well and dries fast. The backyard is now much more enjoyable and grandkid friendly!

Roof Shingles & Copper Strips

In late 2018 I noticed discoloration on my 4-year old shingle roof in Florida. The area affected was in the shade of trees most of the day. I did some research online and discovered that black algae and moss tend to grow on shaded and damp areas of the roof. There were a number of cleaning kits recommended, but I was looking for a more permanent solution. I came across some articles that described the use of copper or zinc strips near the top of the roof line. The theory was that rain water would wash the copper or zinc salts down the roof and this would protect the roof from discoloration due to algae or moss formation. In addition to the theory behind the solution, there were some case histories to back it up. However, reader comments (presumably from those who tried the solution) were somewhat mixed. Some had success with it and some did not. The mixed results may have been due to different locations and environments. I decided to give it a try and purchased some sheets of copper plate which I tucked and attached under the top line of shingles. (see picture below)

IMG_0441

I took some pictures of the problem on the day I attached the copper strips and then again three months later. You can see the results below.

Here is a picture taken just after I installed the copper strip at the end of November 2018 You can notice the ugly discoloration on the shingles.

IMG_0439

The picture below is of the same area taken in mid February 2019. I was hoping that the strips would prevent further discoloration but was pleasantly surprised to notice a marked improvement in the area. It does appear that the metal salt wash after rainfall, not only inhibits but kills standing agae/moss growth.

IMG_0632

I shall take more pictures of the roof in a years time and update this post  to confirm the long term efficacy of the solution – at least in my area of sunny and rainy Florida.

Hobbies

I have always enjoyed working with my hands, from making model airplanes as a young boy to tinkering with tools as I got older. In 2017, while still a school administrator, I enrolled in part-time home improvement and electrician courses in the evenings at the local technical college, anticipating that these skills could well save me some money in retirement. I expected to see a lot of young people in these courses, and was pleasantly surprised to find quite a few “older” students. The practical courses were very enjoyable. One of my course mates, a retired naval aviator remarked that if he were younger, he would have loved to do more training and start a second career as an electrician. I understood and shared his sentiments, but saw it as an avenue in retirement to work on my own home and as a hobby.

Prior to taking these courses I also dabbled in woodworking and have continued to do so. I make simple portable cedar chairs. I started making one each for the grandchildren and now build for others on request.

I have collected a number of tools over the years, some more useful that others. I have organized a small space in the garage for my hobby.  It was not always this tidy, the current pics being the result of time available during retirement.

tools1miterdrill

These are the chairs I make. They are strong and practical and come in two sections that slide together and apart for use, storage and transportation.

chair2chair1chair3

I am by no means a master or expert woodworker.  I am still learning and find it an enjoyable and satisfying  hobby.